Make a splash with these lakeside engineering challenges
A Minnesota summer wouldn’t be complete with a few days “up at the lake.” Whether that’s a trip to a cabin up north or an outing to one of the lakes in the Twin Cities, time together in the water is always enjoyable. It’s also a perfect chance to learn a little science. Here are four easy activities that incorporate some lakeside engineering fun into your next family outing.

Photo: Quora.com
Sandcastles
The quintessential beach activity, sand castle building is a hit with all ages. A few tips to keep in mind before you build your next architectural masterpiece:
- Fine, soft sand will pack better than thick sand.
- A lot of Minnesota beaches have coarser sand near the water and finer sand farther up the shore, so you may have to select a spot away from the water.
- To form your base, make a pile of sand about six inches high and dump on two or three buckets of water. Stomp around on this pile until the sand is sticky and wet. This “sand volcano” that you’ve created is the base for your castle construction.
To build the castle itself, mix equal parts sand and water in a bucket until you get a soupy sand mixture. This is the building material for everything in your castle. It’s always better to have too much water rather than too little – if your sand is too dry, the castle will crumble. You can either shape the structure with your hands or use a mold (cutting the bottom off of an old or leaky bucket is a good technique!). Funnels also make great molds for tower tops. Don’t forget to bring a spray bottle to keep the sand wet and hold your castle together as you build!
Get creative by adding stairs, battlements, or arches. Place a clump of the soupy sand mixture wherever you want, then wait until it dries and can hold its shape before cutting excess away with butter knife or small shovel. When you’re carving, work from top to bottom so excess sand that falls won’t ruin any carving work below.
Build a Boat
Ready for a challenge? Try to construct a boat that both floats in water and can hold weight. Almost any household material will work for this activity. Try using popsicle sticks, egg cartons, cardboard boxes, tinfoil, or corks. You can add sails made out of straws and bits of paper. Use duct tape, glue, or rubber bands to hold your boat together. Test your boat by gently placing a few rocks inside to see whether it can hold the weight.
Your boat builders will have two challenges to consider: water and wind. Remember that if you use paper or cardboard you’ll need to make it waterproof, otherwise the boat will quickly be ruined. This is easily fixed by taping or gluing wax paper over the paper or cardboard. You’ll also need to keep the wind in mind; you don’t want the boat to blow over! The wider the base of your boat, the more stable it will be.
To learn more about the science behind cardboard boats, the James Dyson Foundation has a great video on their YouTube channel.


Will It Float?
The classic game of “Will It Float? Will It Sink?” is a great beach STEM activity for younger kids. Why do some objects float while others sink? The most common first guess is the object’s weight, but it’s actually the object’s density! You can test this by comparing a large stick to a small rock. Even though the stick weighs more, it will still float. The rock will sink because it is more dense.
Density is the ratio of an object’s mass to its volume, or the amount of material of an object compared to the amount of space it takes up. More briefly stated, density is how tightly compacted a material is. A beach ball, for example, has a very low density because there is such a large amount of air inside compared to the amount of plastic on the outside. Objects will float if their density is less than the density of water (1 gram/cubic centimeter), but they’ll sink if their density is greater than the density of water. Try comparing the density of objects you find on the beach – toys, shells, rocks, etc.
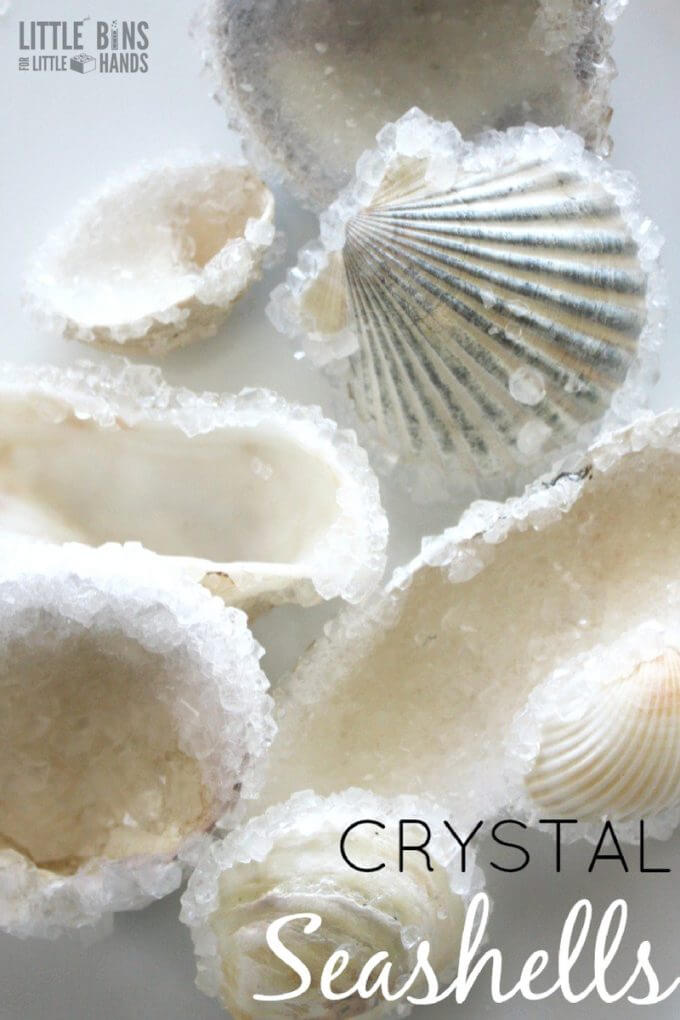
Shell Crystals
When I was younger I would collect dozens of shells at the beach and then I would refuse to leave them there – I just had to take them home with me. Now you can put those shells to use in an easy yet fascinating chemistry lesson.
All you need is borax powder (found wherever you can buy laundry detergent) and boiling water. Dissolve the powder in boiling water, then pour the solution over your seashells. As the solution cools down, the water molecules come back together. This forces the borax particles to separate from the water and land on the nearest surface. They build up to form beautiful crystals on your seashells. You can read the full instructions at Little Bins for Little Hands.